
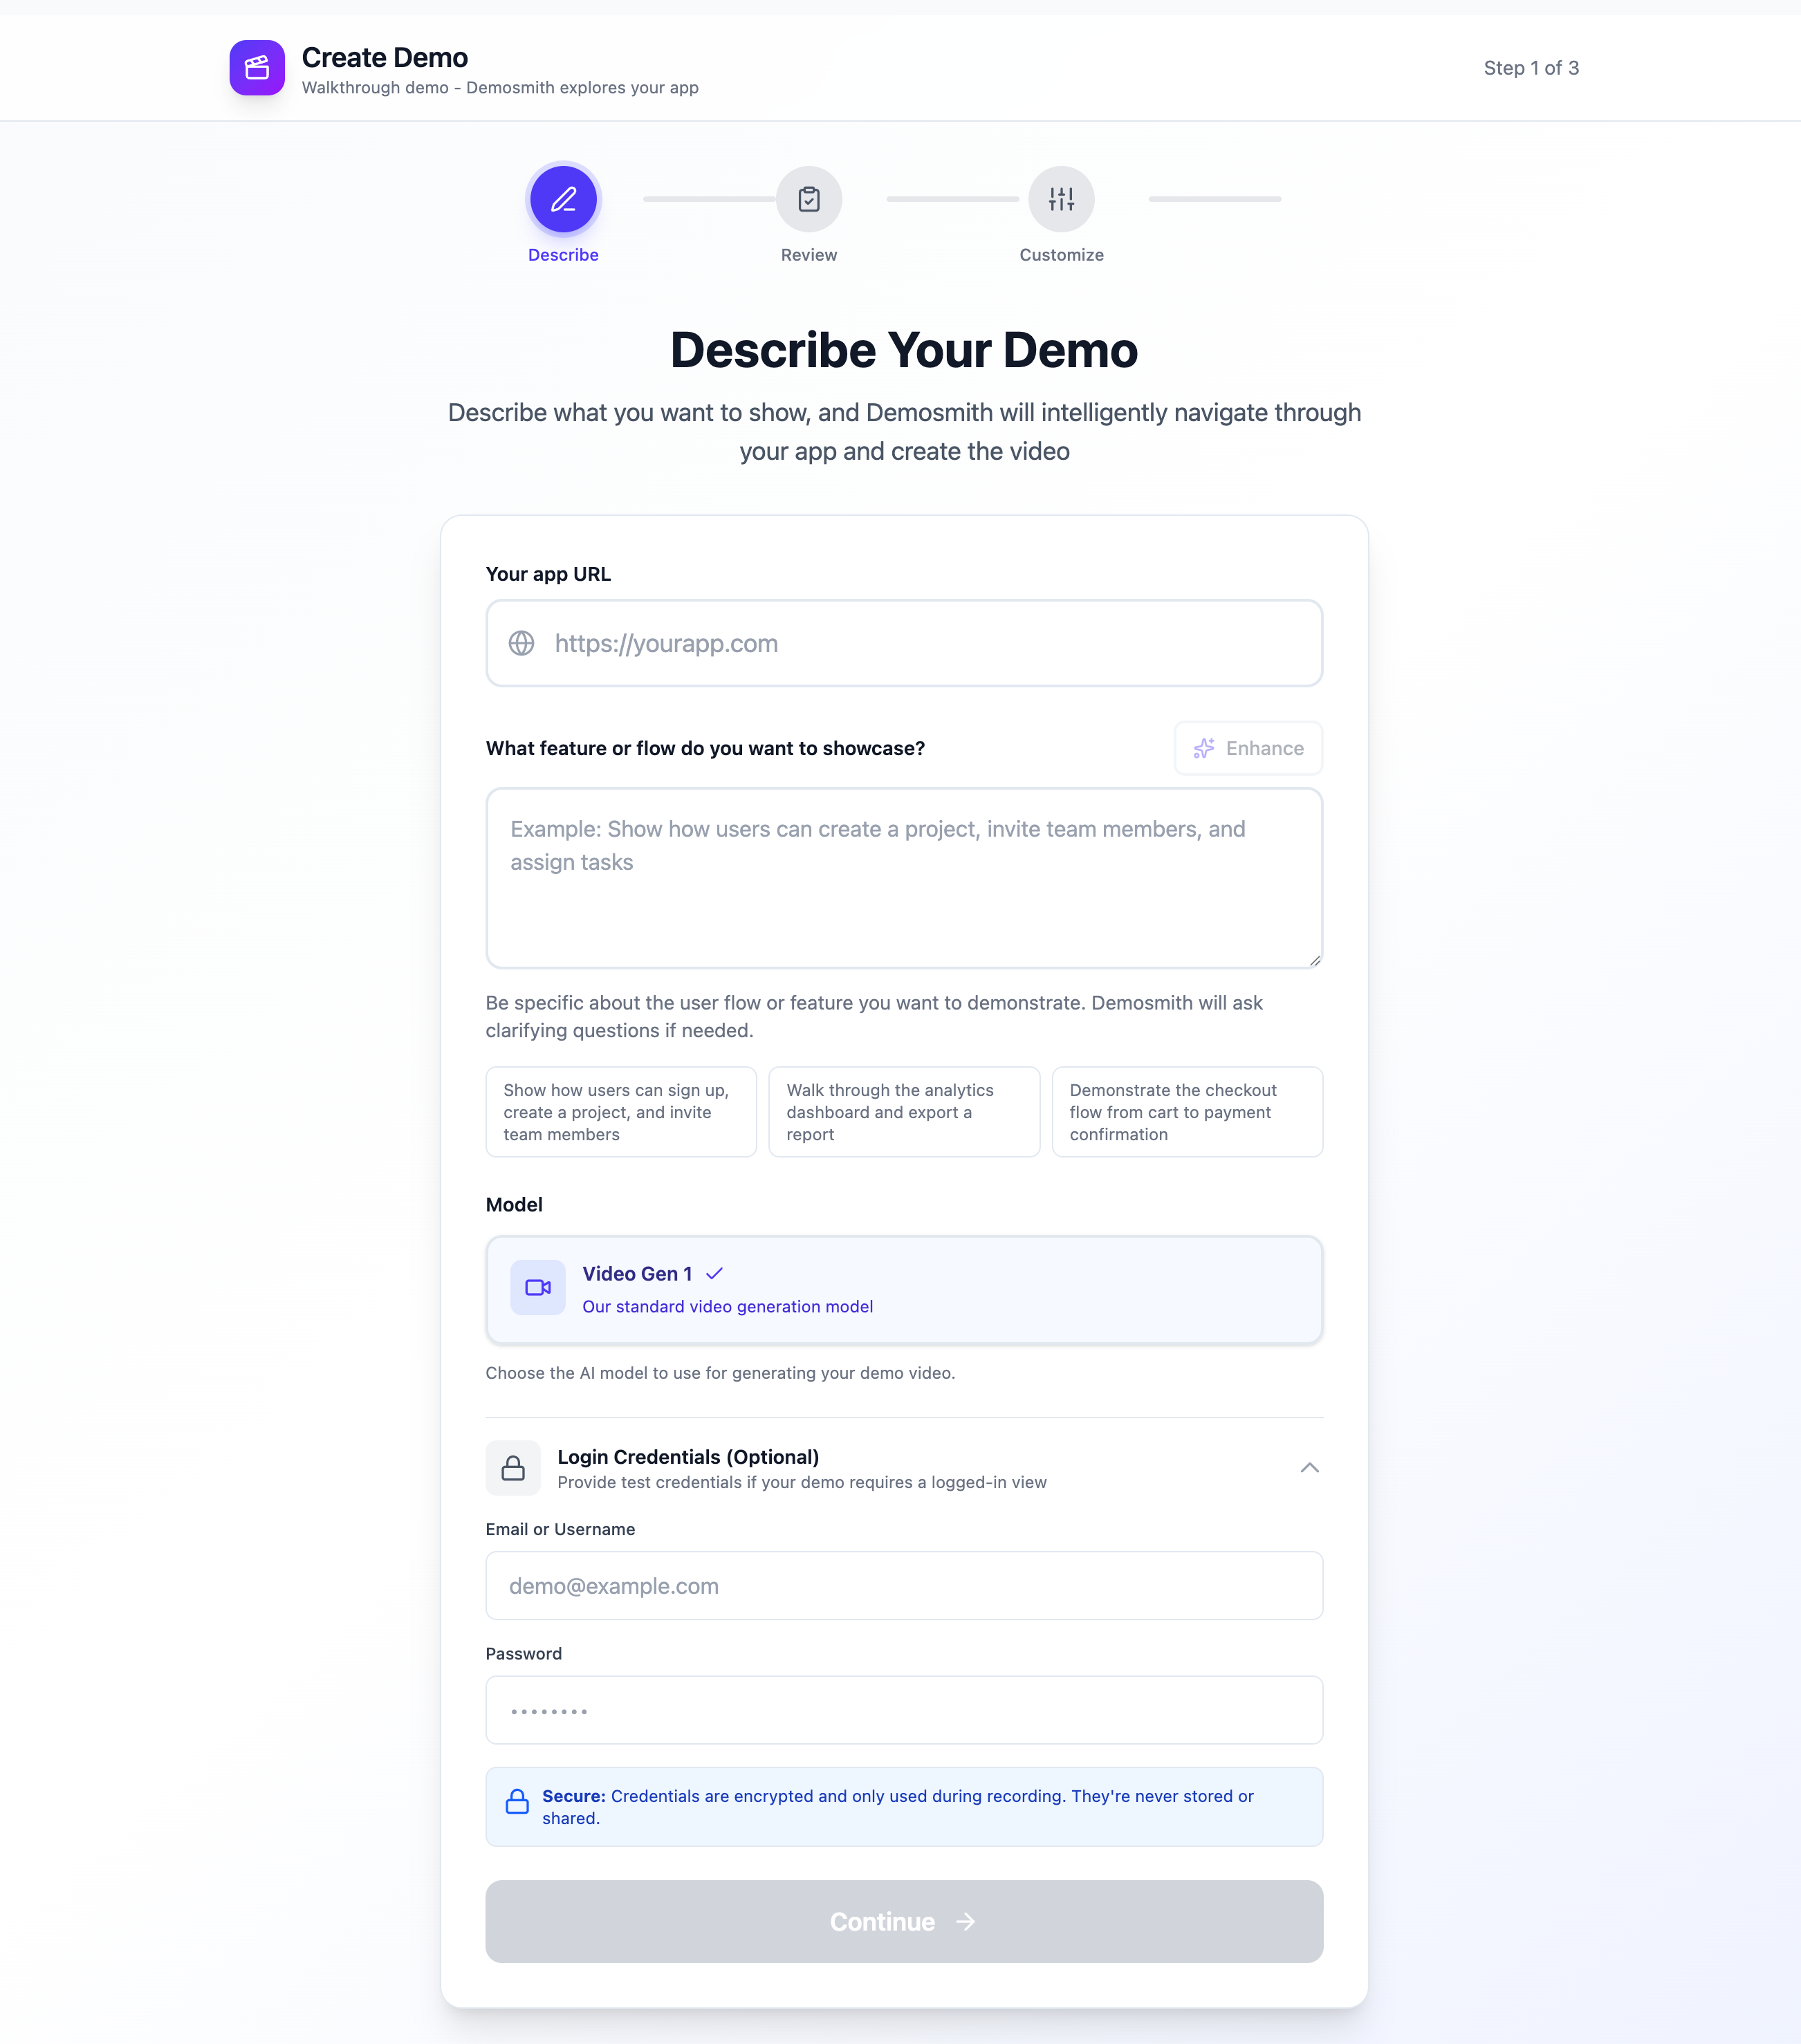
Creating a demo in Demosmith starts with three fields: your app URL, the prompt describing what to show, and an optional Login Credentials section for apps that require a sign-in. The agent uses all three, but the prompt is where the quality of your demo is made or broken.
If your flow includes a file upload step (profile photo, CSV import, document attachment), you don't need to prepare anything. Just write "use a sample file" or "upload a sample [type] file" in your prompt. Demosmith has sample files ready to go: PNG, JPG, PDF, TXT, DOCX, CSV, XLSX, JSON, MP4.
The prompt is the only instruction the agent gets for the actual flow. It will not visit your marketing site, read your docs, or guess what matters to your viewers. A well-written prompt produces a polished 60–90 second walkthrough that a real viewer would watch from beginning to end. A vague one produces a demo that wanders or stops at the wrong screen.
The difference is usually a few specific sentences. This guide shows you exactly what to write and gives you five real prompts you can copy and adapt.
What the agent reads
Once you submit, the agent reads your prompt before it navigates a single page. It does not visit your marketing site, read your documentation, or make assumptions about what your product does. It starts with what you wrote, and nothing else.
File uploads in your demo
If a step requires uploading a file, write "use a sample file" or "upload a sample [type] file" in your prompt. Demosmith picks the right sample and uploads it during recording. No need to prepare your own files. Supported: PNG, JPG, PDF, TXT, DOCX, CSV, XLSX, JSON, MP4.
Your URL and login credentials are handled in their own fields. The prompt itself needs three things:
- Where to start within the app: which view, section, or page to land on first (e.g., "Open the Pipeline view" or "Start from the homepage")
- The flow: the steps in order, written as what the user is trying to accomplish
- Where to end and what to emphasize: the screen to close on and the one or two things the voiceover should make the viewer notice
If any of these are missing, the agent makes a reasonable guess. Sometimes the guess is fine. Often it is not the demo you had in mind. The prompts that produce the best videos are the ones that leave nothing to guesswork.
Browser instructions Demosmith follows closely
When you care about what appears in the recording, use concrete browser instructions. Demosmith executes these precisely.
- Click the View Review button.
- Hover over the AI draft text for three seconds.
- Scroll the right sidebar until the competitor benchmark is visible.
- Point to the selected Professional tone option.
- Type a sample instruction into the custom instructions field.
- Upload a sample image file to the profile photo field.
- Pause on the posted confirmation for two seconds.
These work because they describe visible actions: click, hover, scroll, type, point, show, and pause. Demosmith can execute each one directly.
What Demosmith treats as creative direction
You can include video direction in the same prompt. Demosmith uses it to guide editing, narration, pacing, and emphasis. But it is not a frame-perfect command. The AI may rewrite narration so it sounds natural and fits the footage.
- Open with a short intro explaining the problem.
- Make the narration sound confident and helpful.
- Mention the words "review protection" and "AI response".
- Use a polished SaaS demo style.
- End by returning to the dashboard.
- Add an outro that reminds viewers to visit our website.
Narration is advisory
You can ask Demosmith to mention specific words or explain a specific idea. Do not expect exact line-by-line voiceover.
In the narration, explain that unhappy customers are handled privately while happy customers are guided to Google.
Say exactly: "Our system creates an elegant and seamless reputation moat for every local business."
Demosmith preserves the meaning and important words, but it adapts the script to match the actual video.
Anatomy of a great prompt
Every strong Demosmith prompt has four parts. You do not need headers or bullet points in the prompt itself. Plain prose works fine. But these four elements need to be present in whatever order feels natural.
Starting state
Which view, section, or page within your app the agent should navigate to first. The domain URL goes in the URL field; the prompt tells the agent where to go once the app loads.
The flow
The steps in order, written as user goals rather than UI descriptions. Say what the user accomplishes at each step, not which button to click.
The endpoint
The screen or moment the demo should close on. This is the value delivery: the thing the viewer should feel excited about having just seen.
What to emphasize
One or two lines the voiceover should call out explicitly: speed, ease, a key feature, how few clicks something takes.
Not sure if your prompt is specific enough? Hit the Enhance button in the top-right corner of the prompt field. Demosmith's AI will rewrite your draft, adding structure, clarifying the steps, and sharpening the language. It's a fast way to turn a rough idea into a solid brief without starting from scratch.
Writing goals, not UI steps
The most common mistake new users make is describing the interface instead of the workflow. The agent navigates by goal, not by pixel position. UI language is brittle: a button might be in a different location depending on screen size, account state, or a recent release.
"Open the deal named Acme Corp, log a follow-up call with a note, and move the deal to Negotiation."
"Click the blue button in the top-right corner, then find the dropdown at the bottom of the left sidebar."
"Create a new project, add three tasks, assign them to the user Alex, and set the project deadline to March 15."
"Show the project management features."
"Show the project management features."
A good prompt pattern
Use this structure when you want a detailed demo. It mixes browser instructions with creative direction in one prompt, which is exactly what Demosmith expects.
Goal:
Create a demo for [audience] showing how [product] helps with [job].
Browser flow:
- Start on the dashboard and pause on the main alert.
- Hover over [specific UI element].
- Click [specific button].
- Scroll to [specific section].
- Point to [important fields, cards, or values].
- Upload a sample file (if the step involves a file upload).
- End on [final screen].
Video direction:
- Keep the tone [friendly / confident / technical / executive].
- Mention [specific words or ideas].
- Emphasize [business outcome].
- Add a short intro and outro.
7 example prompts
Each prompt below is ready to copy and adapt. Click Show prompt to read it, then Copy to paste it into the prompt field in Demosmith. Add your URL in the URL field and credentials in the Login Credentials section; those don't belong in the prompt.
Example 1
SaaS signup and first value moment
Best for: landing pages, Product Hunt listings, investor decks. Shows a new user going from your homepage to a real output before the viewer has time to lose interest.
Starting from the homepage, click Get Started and sign up as a new user. Complete the 3-step onboarding wizard: choose Marketing as the team type, connect the sample data source, and run the default dashboard. End on the main dashboard with at least one chart fully loaded. Emphasize in the narration that the user went from homepage to a live, populated dashboard in under three minutes, with no data import required.
Example 2
CRM deal pipeline update
Best for: sales tool demos, team training videos, feature announcements. Shows how fast it is to keep deal records clean and current without switching tabs or writing emails.
Open the Pipeline view. Click into the deal named Acme Corp in the Proposal stage. Log a call: title Follow-up call, duration 20 minutes, note Client wants pricing by end of week. Set a follow-up task for next Friday. Move the deal card to the Negotiation stage. End there, with the deal visible in its new stage. Emphasize in the narration how few clicks it takes to fully document a deal update. No emails, no spreadsheets, no switching tabs.
Example 3
E-commerce checkout
Best for: e-commerce demos, conversion optimization showcases, checkout flow walkthroughs. Shows the complete purchase experience to highlight speed and friction-free design.
From the homepage, search for wireless headphones. Filter results by Under $100. Click the first product. Select color Black and quantity 1. Add to cart. Proceed to checkout as a guest and complete a test purchase. End on the order confirmation screen showing the order number. Emphasize that the entire purchase required no account creation and took under two minutes from homepage to confirmation.
Example 4
Analytics dashboard drill-down and export
Best for: data and analytics tools, business intelligence platforms, reporting features. Shows a complete question-to-answer workflow that ends in a tangible deliverable.
Open the main Analytics dashboard. Set the date range to the last 30 days. Expand the Traffic Sources breakdown chart. Hover over the Organic Search bar to show the tooltip with the exact value. Click Export and choose CSV. End on the file download confirmation. Emphasize in the narration that getting from the dashboard to a downloaded report takes under five clicks: no custom report setup, no waiting for a data team.
Example 5
Team invite and permission setup
Best for: enterprise SaaS, team collaboration tools, security-focused demos. Shows buyers how granular your access controls are without needing a live sales call.
Open Settings and navigate to the Team tab. Click Invite Member. Enter the email newuser@acme.com, set their role to Editor, and assign them to the Product workspace only. Send the invitation. End on the pending invitation confirmation screen with the new user's email visible. Highlight in the narration that admins can control both role and workspace access from a single screen, with no IT ticket required.
Example 6
Dashboard tour for a review management tool
Best for: product pages, onboarding sequences, feature deep dives. Walks through the main dashboard with specific browser instructions so the recording captures exactly the right moments.
Create a product demo for local business owners.
Start on the dashboard. Hover over the urgent review alert, then click View Review. Pause on the review card and point to the reviewer name, star rating, and AI draft response. Hover over the draft long enough for viewers to read it, then click Approve and Post and pause on the posted confirmation.
Next, show the right sidebar. Scroll to the auto-post rules and point to each rating rule. Then scroll to the competitor benchmark and point to our business row and the competitor score bars.
For the video, explain that the product helps businesses protect their reputation, respond faster, and turn happy customers into more public reviews. Keep the narration clear and confident. Add a short intro and outro.
Example 7
Settings and billing walkthrough
Best for: sales enablement, admin onboarding, pricing page demos. Shows configuration and plan details without recording a real billing session.
Show how an admin configures the product.
Click Settings. Point to Business Name, Owner Name, and Business Type. Scroll to the Response Tone options and hover over Professional. Scroll to Advanced Instructions and hover over the custom instructions text.
Then click Upgrade Plan. Point to the Pro price, the founding rate note, and the main feature checklist. Hover over Manage Billing but do not click it.
For narration, explain that setup is simple and that the plan is built for growing teams. Do not make the video sound too salesy.
Mistakes to avoid
Most demos that don't turn out right come down to one of these mistakes. All of them are easy to fix once you know what to look for.
-
Not specifying where to start within the app
The URL field handles the domain, but once the app loads, the agent needs to know where to go. If your demo should start in the Pipeline view, or the Analytics tab, or after navigating to a specific record, say so. Without it, the agent will start from whatever the app loads by default, which may not be where you want.
-
Too many flows in one prompt
If your prompt asks the agent to show signup, the dashboard, settings, team management, and the export feature, the output will be scattered and over 3 minutes long. Viewers stop watching at 90 seconds. One prompt, one workflow. Split everything else into separate demos.
-
Describing the UI instead of the goal
Prompts that say "click the gear icon in the top-right corner" are fragile. The agent navigates by intent. If the icon moves, the agent gets confused. Write what the user is trying to accomplish ("Open Settings") and let the agent find its way there.
-
No endpoint
If you don't say where the demo should end, the agent will pick a stopping point. It might cut off before the payoff moment: the thing viewers came to see. Name the frame you want to close on, even if it's just "end on the confirmation screen."
-
Expecting exact frame-by-frame timing
Demosmith controls pacing, transitions, and cuts. You can say "pause on the confirmation for two seconds" but you cannot script every cut point in advance. Trust the video agent to adapt timing to the footage.
-
Hovering and clicking the same element at the same time
These are separate actions. Pick one. If you need both, list them as distinct steps: hover first, then click.
-
Asking for intro animations or music without browser steps
If your entire prompt is "add a logo scene with background music," there is no browser flow to record. Give useful steps first, then layer creative direction on top.
-
Claiming a feature the UI never shows
Demosmith records a real browser session. If a feature does not appear on screen, the agent cannot demonstrate it. Make sure what you ask for is actually visible in the app.
Not sure how to start? Use this AI helper prompt
If you have a clear sense of what you want to show but aren't sure how to phrase it, paste the template below into ChatGPT, Claude, Gemini, or any other AI with your product details filled in. It will write the Demosmith prompt for you.
AI helper prompt
Fill in the placeholders, paste into ChatGPT, and use the result in Demosmith.
I'm creating a product demo video with Demosmith, an AI agent that opens a real browser, navigates a live web app step by step, generates a professional voiceover, adds transitions and captions, and exports a finished MP4.

The Demosmith prompt only describes the flow to show. The app URL goes in a separate URL field, and login credentials go in a separate Login Credentials section; they don't belong in the prompt itself.

My product:
[One sentence: what it does and who it's for]

The workflow I want to demo:
[Describe the user goal, e.g. "a new user completing signup and seeing their first report" or "an admin inviting a teammate and setting their permissions"]

Target viewer:
[Who will watch this, e.g. potential customers on a landing page, investors in a pitch deck, new users during onboarding]

Where in the app the demo should start:
[Which view, section, or page the agent should navigate to first after the app loads, e.g. "the Pipeline view", "the Analytics tab", or "the homepage"]

Anything to skip or emphasize:
[What the voiceover should highlight, any UI elements to avoid, steps to keep short, or a key outcome to land on]

Does the flow involve uploading a file?
[Yes/No. If yes, include "upload a sample file" in that step. Demosmith has sample files for images, documents, spreadsheets, data, and video.]

Using these details, write a Demosmith prompt that:
1. Names the starting view or section within the app (not the URL)
2. Lists each step of the workflow in plain English, in order, written as user goals rather than UI instructions
3. Names the screen or moment the demo should end on
4. Tells the agent what the voiceover should emphasize (speed, ease, outcome, number of clicks)
5. Keeps the total walkthrough focused on a single outcome, no more than 60 to 90 seconds

Write the prompt in plain instructional prose, as if you are briefing a colleague who will navigate the product on camera.
Key takeaways
- The prompt is for the flow only. Your app URL goes in the URL field, and login credentials go in the Login Credentials section. Neither belongs in the prompt text.
- Every strong prompt has four parts: where to start within the app, the steps in order, a clear endpoint, and what the voiceover should emphasize.
- Write user goals, not UI steps. "Open the Pipeline view and log a call" is more reliable than "click the dropdown in the sidebar." The agent finds its own path.
- If a step involves uploading a file, say "use a sample file" in the prompt. Demosmith has sample files ready (PNG, JPG, PDF, TXT, DOCX, CSV, XLSX, JSON, MP4). No need to bring your own.
- Keep each prompt to one workflow. A 90-second demo of one thing done well outperforms a 4-minute tour of everything every time. If you need help structuring your narration, our demo video script templates pair well with these prompts.
- If your prompt feels rough, use the Enhance button. Demosmith's AI will rewrite it for you before the agent runs.
- If you're not sure where to start at all, copy the AI helper prompt above, paste it into ChatGPT, Claude, Gemini, or any AI, fill in your product details, and use the output as your first draft.
Two things to know before you submit
- The agent may ask a clarifying question. If your prompt is ambiguous (for example, it mentions "the main dashboard" but your app has several), Demosmith will pause and ask before continuing. Just answer it and the run resumes. This is how the agent avoids guessing wrong on something important.
- Nothing is final until you export. After the agent generates your video, the Customize step lets you edit the voiceover text, adjust clip timing, trim sections, and change any part of the output. You are not locked into the first result.
Once your demo is ready, you can embed it directly on your website with a single line of code or convert it into a document for help centers and internal docs. The embed works on WordPress, React, Webflow, and any platform that supports HTML.