Why Every SaaS Team Needs Product Demo Videos
You already know your product needs a demo video. Your landing page feels incomplete without one. Your sales team keeps asking for something to send prospects after calls. Your help center gets the same questions about features you could show in 60 seconds.
The data backs you up. According to Wyzowl's 2026 report, 85% of people have been convinced to buy a product or service by watching a video. Shoppers who watch product demo videos are 1.81x more likely to purchase than those who do not. And landing pages with video content see 86% higher conversion rates than pages without.
The problem is not demand. Every product team wants more demo videos. The problem is production. Creating a single demo video the traditional way takes 4 to 8 hours. Most teams need 5 to 15 demos across their marketing funnel, help center, and sales process. That math does not work for anyone shipping product at a modern pace.
This guide covers every method for creating product demo videos in 2026: the traditional manual process, hiring agencies, and the new AI-powered approach that takes under 10 minutes. By the end, you will know exactly which method fits your team and how to execute it step by step.
The Traditional Demo Video Process (And Why It Takes 4+ Hours)
If you have ever made a product demo video the old-fashioned way, this seven-step workflow will look familiar. Painfully familiar.
- Script writing (30-60 minutes): Outline what to show, what to say, and in what order. Most teams iterate 2-3 times before the script feels right.
- Environment preparation (15-30 minutes): Set up a clean demo environment with realistic data. Close every tab. Disable notifications. Make sure your product is in the right state to begin recording.
- Screen recording (30-90 minutes): Hit record and click through your product while trying to narrate naturally. One wrong click, one hesitation, one stray Slack notification, and you start over. Most people do 4-7 takes before they get one they can use.
- Video editing (60-120 minutes): Cut out mistakes, add transitions, zoom into key areas, adjust timing, and clean up the footage. This step alone requires decent video editing skills.
- Voiceover recording (30-60 minutes): Record narration separately for better audio quality, then sync it to the video in post-production.
- Branding and polish (30-60 minutes): Add intro and outro cards, your logo, brand colors, captions, and background music.
- Export and review (15-30 minutes): Render the final video, watch it end to end, catch issues, and re-edit if needed.
Total time: 4 to 8 hours for a single video. And that assumes you already have video editing skills. If you are a founder, product marketer, or growth lead without a production background, add another few hours for the learning curve.
The average SaaS company needs 5 to 15 demo videos across marketing, sales, onboarding, and support. At 4-8 hours per video, that is 20 to 120 hours of demo production. An entire sprint, burned on video editing.
Multiply that by UI updates every quarter, and the cost compounds fast. Every redesign invalidates your existing demos. Every new feature needs its own walkthrough. The traditional process was built for a world where products shipped twice a year. SaaS teams shipping weekly cannot keep up.
Step 1: Plan Your Demo Before Anything Else
No matter which creation method you choose, planning is the step that separates a compelling demo from a forgettable one. Skip it and you will waste time re-recording or re-generating. Get it right and everything downstream goes faster. For teams that want help structuring the planning phase, using ChatGPT to plan your demo video can accelerate the scripting and storyboarding steps.
Define Your Audience
A demo built for a CMO evaluating your platform looks completely different from one built for a developer exploring your API. Before you write a single word or click a single button, answer these questions:
- Who is watching this? A prospect on your landing page? A lead who just booked a sales call? A new customer onboarding for the first time?
- What do they already know? A cold prospect needs context. An existing user exploring a new feature does not.
- What action should they take after watching? Sign up, book a call, activate a feature, upgrade their plan?
Choose the Right Flow
Every product has dozens of possible demo flows. Picking the right one depends on your goal. Focus on a single workflow that solves a specific pain point. Do not try to show everything in one video.
Common demo flows that drive results:
- The "aha moment" flow: Show the single action where your product clicks for new users
- The pain-to-solution flow: Start with the problem, show your product solving it
- The feature spotlight: Deep dive into one capability for prospects who are already interested
- The "day in the life" flow: Walk through a realistic daily workflow to show ongoing value
Structure the Narrative: Problem, Solution, Outcome
The strongest demo videos follow a three-act structure. Open with the problem your viewer faces. Show your product solving it. End with the result they can expect. This structure works because it mirrors how people make purchasing decisions: they feel the pain, see the fix, and imagine the payoff.
Match your demo length to the use case:
- Landing page or homepage: 60-90 seconds. Hook fast, show value, end with a CTA.
- Sales outreach or follow-up: 2-3 minutes. Enough depth to answer questions, short enough to get watched.
- Training or onboarding: 3-5 minutes. Walk through specific workflows with enough detail for someone to replicate them.
Research shows that demos under 3 minutes get significantly higher completion rates. Videos under 60 seconds hit 71% completion, while anything over 2 minutes drops below 56%. Every second of your demo needs to earn its place. Our data-backed guide to demo video length breaks this down by use case and platform.
Step 2: Choose Your Creation Method
In 2026, you have three realistic options for creating product demo videos. Each comes with different trade-offs on time, cost, quality, and scalability.
Option A: Manual Screen Recording
Tools like Loom, OBS, and QuickTime let you capture your screen while narrating. This is the most common approach and the one most teams default to.
How it works: Open your product, start recording, click through your flow, narrate as you go. Edit the footage in a tool like Camtasia, Final Cut, or DaVinci Resolve. Add branding, export, and publish.
Pros:
- Full control over every frame
- Low cost if you already have the tools
- No dependency on third-party services
Cons:
- Takes 4-8 hours per video including editing
- Quality depends on your recording and editing skills
- Every UI change means a full re-shoot
- No scalability: ten videos take ten times the work
- Localization requires re-recording everything per language
Option B: Hire an Agency or Freelancer
Professional video production agencies and freelance editors can produce high-quality demo videos with polished motion graphics, professional voiceover, and cinematic editing.
Typical costs: $2,000 to $30,000 per video depending on complexity, animation, and production value. Professional voiceover artists charge $500 to $3,000 per video. The average cost per finished minute lands between $1,000 and $3,000.
Typical timelines: 2 to 8 weeks from brief to final delivery. Expect 2-3 rounds of revisions built into that timeline.
Pros:
- Highest production quality
- Professional motion graphics and animation
- No internal time investment beyond review
Cons:
- Expensive: a full demo library can cost $20,000 to $100,000+
- Slow: weeks of turnaround per video
- Updates require a new engagement and new costs
- Agency knowledge gap: they do not know your product like your team does
Option C: AI Demo Generation
AI demo agents like Demosmith represent the newest approach. You provide a product URL and a description of the flow you want to show. An AI agent navigates your product autonomously, captures footage, edits it, generates voiceover, and delivers a finished MP4.
How it works: Paste your product URL. Describe the workflow in plain language. The AI launches a cloud browser, clicks through your product, records the screen with precise cursor movements, auto-edits the footage with zooms and transitions, generates a natural voiceover, adds captions, and exports the final video. Total time: under 10 minutes.
Pros:
- 10 minutes from URL to finished video
- No recording, editing, or voiceover skills required
- Voiceover and captions in 29 languages
- Regenerate in minutes when your UI changes
- Consistent quality across every video
Cons:
- Video output only (not interactive click-through demos)
- Complex authentication flows may need guidance
- Less manual control than frame-by-frame editing
For a detailed comparison of AI tools in this category, see our guide to the best AI demo video generators in 2026.
Comparison: All Three Methods at a Glance
| Factor | Manual Recording | Agency / Freelancer | AI Generation (Demosmith) |
|---|---|---|---|
| Time per video | 4-8 hours | 2-8 weeks | Under 10 minutes |
| Cost per video | Free (your time) | $2,000-$30,000 | Starting at $40/mo |
| Quality | Varies by skill | High (professional) | High (consistent) |
| Scalability | Linear (10x work for 10 videos) | Linear (10x cost) | High (flat subscription) |
| Maintenance | Full re-shoot per update | New engagement per update | Regenerate in 10 minutes |
| Localization | Re-record per language | $1,000+ per language | 29 languages built in |
Step 3: Recording Tips That Save Hours of Re-Takes
If you go the manual screen recording route, these tips will cut your recording and editing time significantly. Most people waste hours on re-takes because they skip basic preparation.
Prepare Your Environment
Before you hit record, set up your workspace:
- Close every application except your product and your recording tool
- Disable all notifications: Slack, email, calendar, OS-level alerts
- Set your browser to full screen or a fixed window size (1920x1080 is standard)
- Clear your browser history, bookmarks bar, and any personal data visible on screen
- Use a clean browser profile dedicated to demo recording
Use Realistic Test Data
Nothing undermines a demo faster than seeing "test@test.com" or "John Doe" as placeholder data. Populate your demo environment with realistic names, email addresses, company names, and sample content. It takes 10 extra minutes of setup and makes your demo look professional instead of thrown together.
Move Your Cursor Deliberately
The most common amateur mistake in screen recordings is erratic cursor movement. Your cursor is the viewer's guide. Move it slowly and deliberately to each click target. Pause for a beat before clicking so the viewer can see where you are about to interact. Avoid aimless mouse wandering between actions.
Record Audio Separately
Recording narration while navigating your product is hard. Your brain tries to do two things at once, and the result is choppy narration with awkward pauses. Record the screen capture first, silently. Then record your voiceover as a separate audio track while watching the footage. This gives you clean audio and lets you focus on each task independently.
Keep It Under 3 Minutes
Completion rates drop sharply after the 2-minute mark. Videos under 60 seconds hold 71% of viewers. Videos between 1-2 minutes hold 56%. If your demo runs longer than 3 minutes, split it into multiple focused videos. A series of three 90-second demos outperforms a single 5-minute video every time.
Step 4: The AI-Powered Method (URL to Video in 10 Minutes)
The AI approach eliminates every pain point in the traditional process. No recording setup. No re-takes. No video editing skills. No voiceover sessions. Here is the complete workflow using Demosmith.
Paste Your Product URL
Start by entering the URL of the page where your demo flow begins. This can be your app's login page, a specific feature page, or any publicly accessible URL. Demosmith's AI agent launches a cloud browser and loads your product in a clean, controlled environment.
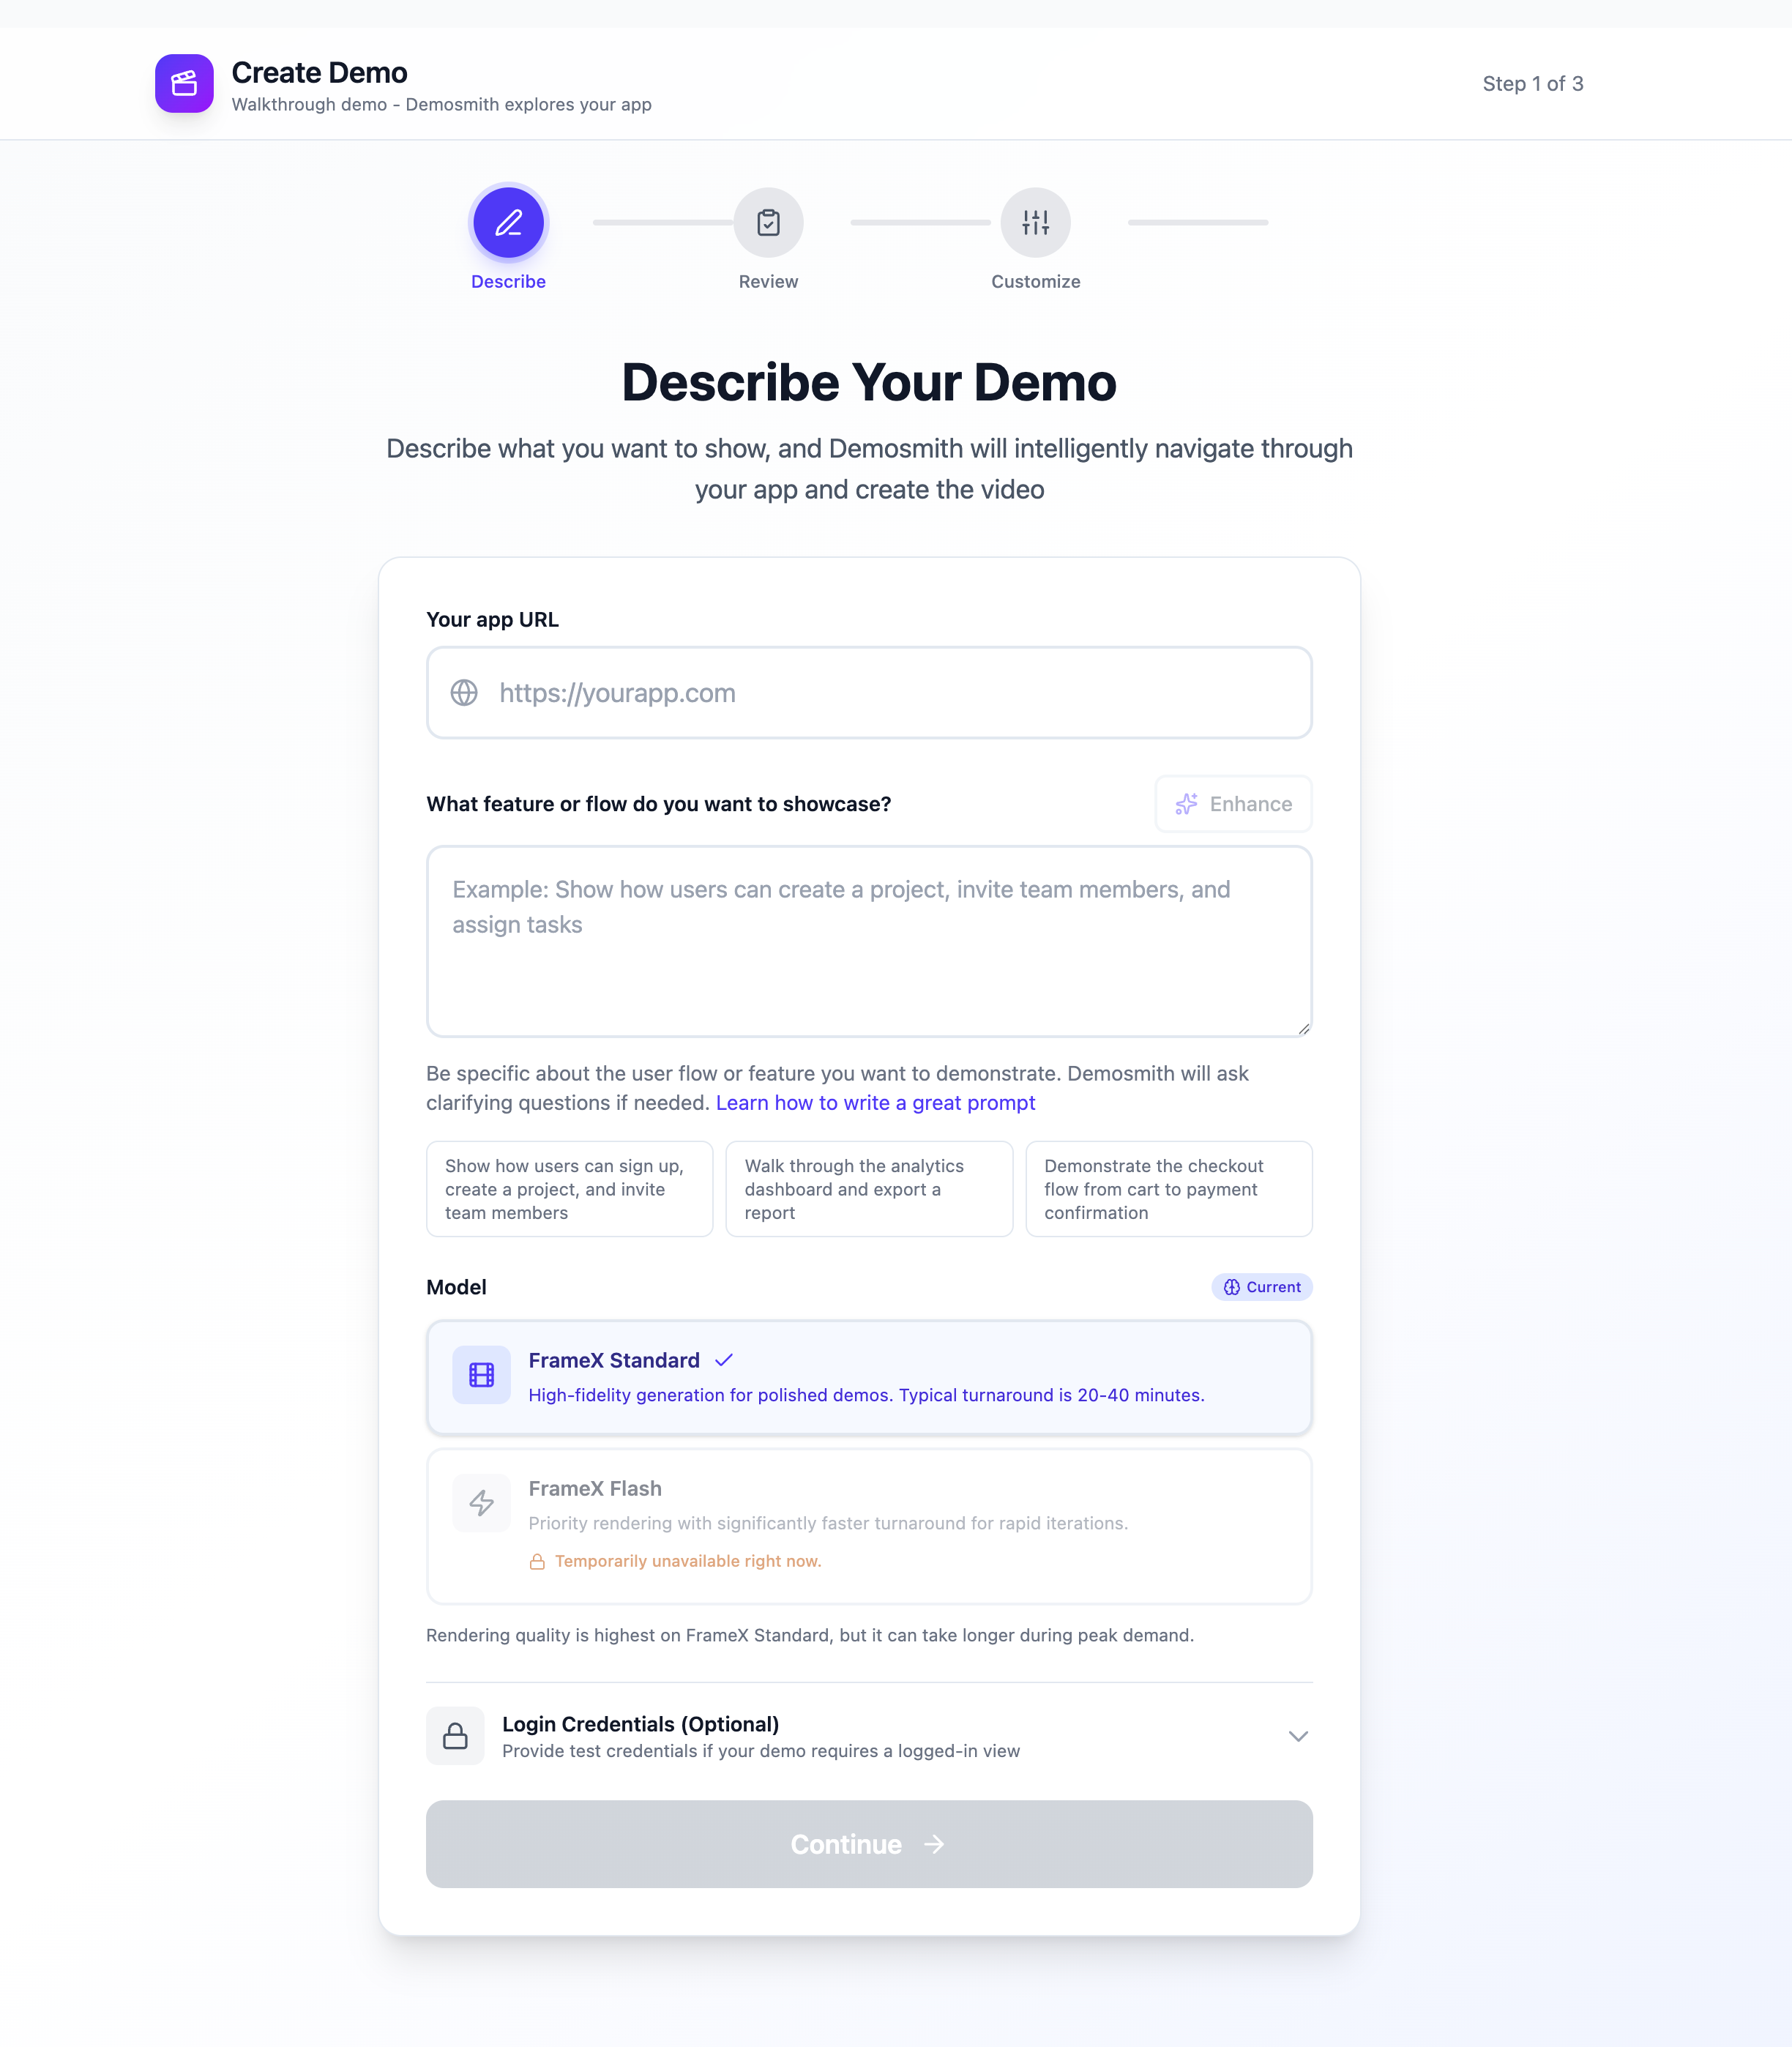
The Demosmith create page: enter your URL, describe the flow, choose your rendering model, and optionally provide login credentials.
Describe the Flow in Plain Language
Tell the AI what you want to show. Write it the way you would brief a colleague. For example:
"Log in to the dashboard. Create a new project called 'Q2 Marketing Campaign.'
Add three team members. Set the deadline to next Friday.
Switch to the Kanban view and drag a task from 'To Do' to 'In Progress.'
End on the project overview showing the progress chart."
The more specific you are, the better the output. For detailed guidance on writing effective prompts, see our Demosmith prompting guide with ready-to-copy examples.
AI Navigates Your Product Autonomously
This is where Demosmith differs from every screen recording tool on the market. The AI agent clicks buttons, fills in forms with realistic data, uploads sample files when a step calls for it, scrolls through pages, and navigates your entire flow without any human involvement. It captures high-resolution footage of each step with precise, deliberate cursor movements. No notification pop-ups. No shaky mouse. No accidental clicks.
Auto-Editing, Voiceover, and Captions
After capturing the raw footage, the AI processes it automatically:
- Smart editing: Trims dead space, adds zoom effects on key interactions, smooths transitions between steps
- Script generation: Writes a natural narration script based on what is happening on screen
- AI voiceover: Generates professional-quality voiceover using ElevenLabs text-to-speech
- Captions: Adds synchronized captions to the video
- Localization: Voiceover and captions available in 29 languages out of the box
Export and Share
The output is a downloadable MP4 file and a shareable link. No rendering queue. No waiting overnight. The video is ready to embed on your website, drop into a sales email, or post on social media. To learn how to create a full SaaS demo without recording, we have a dedicated walkthrough that covers the end-to-end process.
Step 5: Edit and Polish Your Demo Video
Whether you recorded manually or generated with AI, a few editing decisions make the difference between a good demo and one that actually converts.
Trim Dead Space
Every second where nothing meaningful happens is a second your viewer considers leaving. Cut loading screens, page transitions that take too long, and pauses between actions. The pacing should feel brisk but not rushed. Each frame should show progress.
Add Zoom Effects on Key Actions
When you click an important button, fill in a critical field, or reveal a key result, zoom the camera in. This draws the viewer's eye to exactly the right place and signals "pay attention, this matters." Subtle 1.5x to 2x zooms work best. Avoid jarring jumps.
Include Captions (Always)
A large percentage of video views happen with sound off, especially on LinkedIn and in office environments. Captions ensure your message lands regardless. They also improve accessibility and boost SEO when you embed your video on a webpage. If you use AI generation, captions come built in.
Add a Strong CTA at the End
Your demo video should end with a clear next step. "Start your free trial at demosmith.ai." "Book a demo with our team." "Try it yourself in under two minutes." Do not let the video fade to black without telling the viewer what to do next. The last five seconds are the most valuable real estate in your entire demo.
Editing Inside Demosmith
Demosmith does not just generate and leave you with a take-it-or-leave-it video. After the AI produces your demo, you get a full editing workspace where you can fine-tune every detail before rendering the final version.
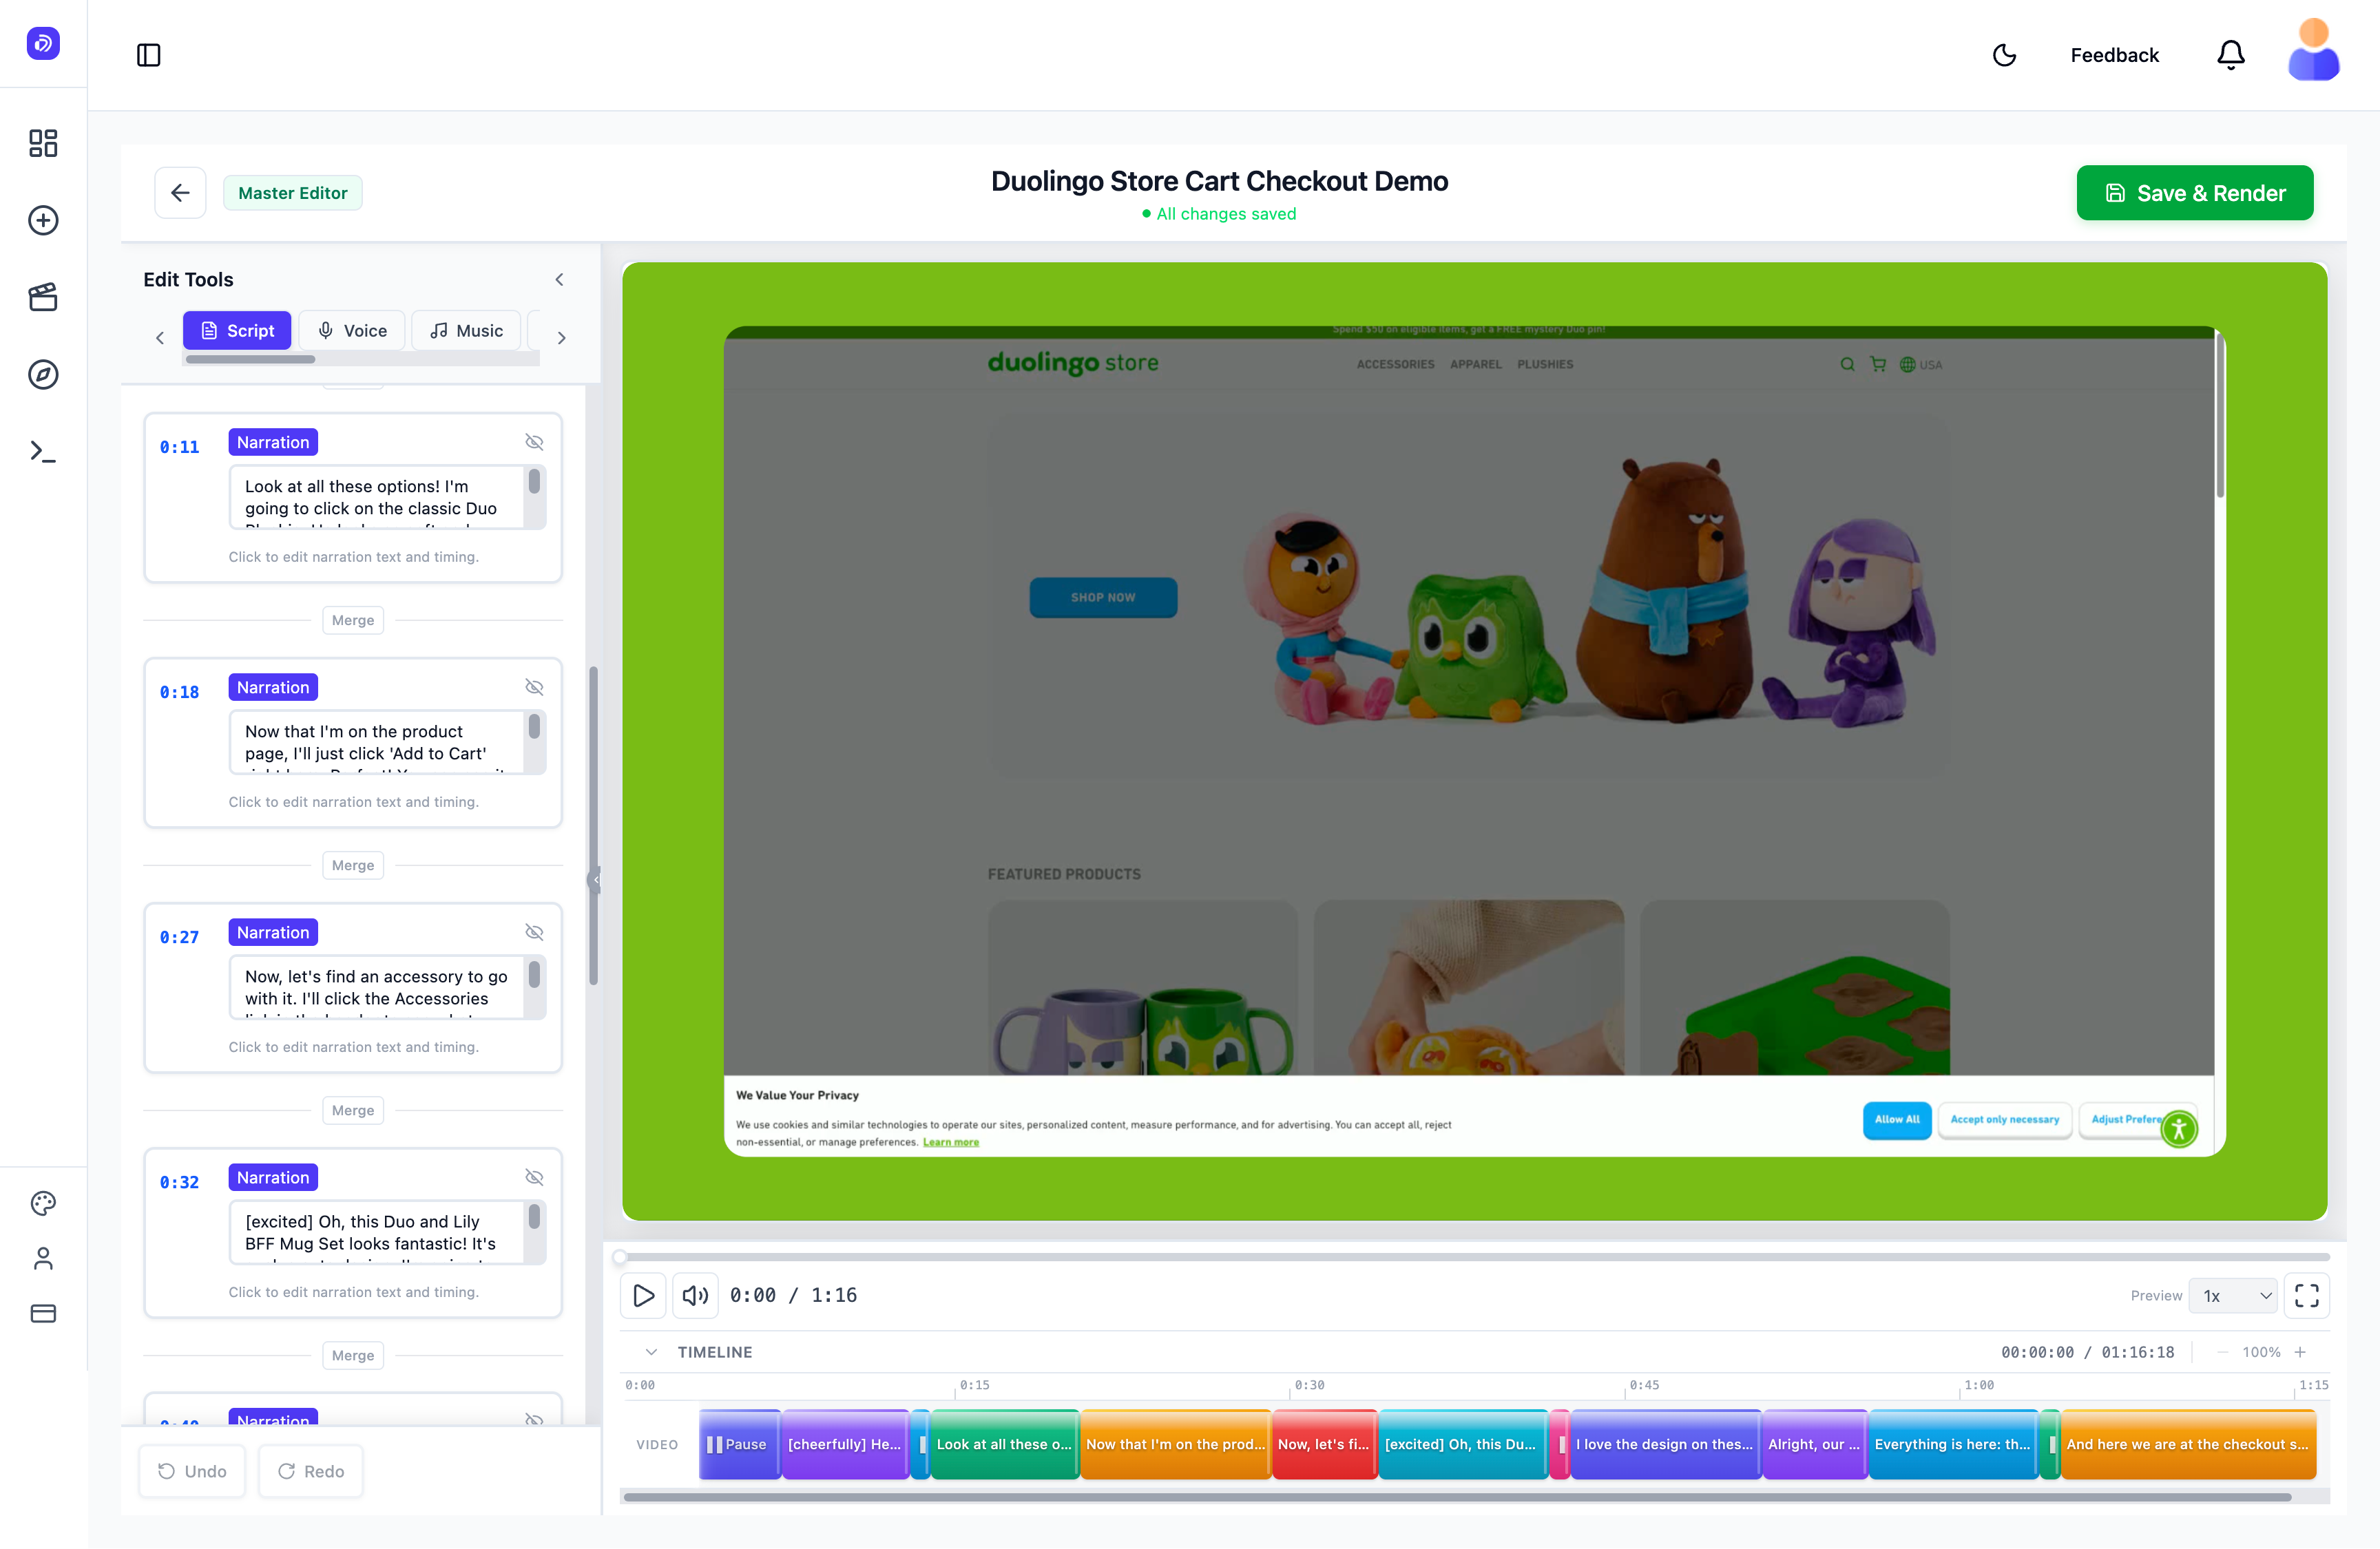
Demosmith's built-in editor: rewrite narration, adjust timing, swap voices, and add music, all before rendering.
The editor is surprisingly powerful. Every change you make shows up in real time in the preview panel, so you can see exactly what your final video looks like before you render. Here is the full list of what you can control:
- Script and narration: Each scene has its own narration block. Click any block to rewrite the voiceover text. The AI regenerates the audio for just that section, so you do not need to redo the entire video.
- Voice and language: Swap the AI voice to match your brand tone, or switch the entire narration to a different language. Useful when you need the same demo in English for your US site and French for your EU site.
- Background music: Add, change, or remove background music. Adjust the volume so it sits behind the narration without competing.
- Intro and outro: Add branded intro and outro cards to bookend your demo with your logo and CTA.
- Background image: Set a custom background behind your product UI for a cleaner, more branded look.
- Cut and crop: Remove sections you do not need or crop the frame to focus on a specific part of the screen.
- Zoom: Add zoom effects to draw attention to key clicks, form fields, or results.
- Blur: Blur sensitive content like customer data, pricing, or internal tools that should not appear in the final video.
- Speed control: Speed up repetitive sections (like loading screens) or slow down important moments so the viewer has time to absorb what is happening.
- Subtitle styles and language: Customise subtitle font, size, colour, and position. Switch the subtitle language independently from the voiceover language.
The real-time preview is the part that changes the editing experience. You do not render, wait, watch, then go back and fix. You make a change and see it instantly. Rewrite one line of narration, watch it play back, adjust the timing, and move on. The whole editing loop takes minutes instead of hours.
This means Demosmith handles the heavy lifting (recording, navigation, initial edit, voiceover) while you keep full creative control over the final product. Swap the voice for a different market. Blur a customer name. Add your intro music. Speed through a loading screen. Then hit "Save and Render" to export the finished MP4.
Step 6: Distribute Your Demo Video Where It Matters
A great demo video sitting in a Google Drive folder helps nobody. Distribution determines whether your demo drives pipeline or collects dust.
Homepage and Landing Pages
Your landing page is the highest-leverage placement. Visitors who watch a product demo on a landing page are 1.81x more likely to convert than those who skip it. Place your demo above the fold or immediately after your hero headline. Keep it under 90 seconds for homepage placement. Autoplay on mute with captions enabled works well.
If you use Demosmith, you can embed demos directly on any website with a single iframe tag.
Sales Outreach
Instead of asking prospects to sit through a 30-minute live demo, send a 2-minute video in your outreach. This lets prospects evaluate your product on their own time and come to calls better informed. Teams using pre-built demo videos in their sales process report measurably shorter sales cycles. For a complete playbook on this approach, read our guide on using demo videos in cold email and sales outreach.
Help Center and Support Documentation
Short, task-focused demos (30-90 seconds) embedded in your help center reduce support ticket volume. When a customer asks "How do I do X?" a 60-second video answers the question faster than a 500-word article with screenshots.
Social Media
Short demo clips perform well on LinkedIn, Twitter/X, and YouTube. Extract the most compelling 15-30 seconds of your full demo and format it for each platform:
- LinkedIn: Square or vertical format, captions always on, focus on business outcomes
- Twitter/X: Under 60 seconds, lead with the most visually interesting moment
- YouTube: Full-length demos with SEO-optimized titles and descriptions
Product Hunt
If you are preparing for a Product Hunt launch, a polished demo video is the single most important asset on your page. It is the first thing visitors watch. Make it tight, compelling, and under 2 minutes. For launch-specific advice, see our guide on creating a demo video for your Product Hunt launch.
Step 7: Keep Your Demos Up to Date
This is the step most teams skip, and it costs them. Stale demo videos actively hurt your brand. When a prospect watches a demo that shows a UI your product no longer has, they lose trust before they even sign up.
The Demo Debt Problem
We call it "demo debt," and it works the same way as technical debt. Every time your team ships a UI change, a redesigned settings page, or a new onboarding flow, your existing demo videos fall out of date. Most teams cannot justify spending another 4-8 hours re-recording every time a button moves. So the demos stay stale. Weeks turn into months. The gap between your product and your demos keeps growing.
The Manual Fix
With screen recording, updating a demo means a full re-shoot. Same 4-8 hour process. Same setup, same takes, same editing. If you have 10 demo videos and your product redesigns quarterly, that is 40-80 hours of re-recording per year just to stay current.
The AI Fix
With AI demo generation, updating a video means re-running the same prompt. Paste the URL, use the same flow description, and get a fresh video in 10 minutes. Your entire demo library stays current with your latest UI, without anyone sitting down to record.
For a deeper look at this problem and how to solve it systematically, read our guide on how to keep your demo videos evergreen.
Start Creating Better Demo Videos Today
You have three paths to a finished product demo video. Manual recording gives you full control but costs 4-8 hours per video and does not scale. Hiring an agency produces premium results but costs thousands of dollars and takes weeks. AI generation delivers polished videos in under 10 minutes at a fraction of the cost. One high-impact use case worth prioritising early is your G2 or Capterra listing, where a demo video can lift conversions by 14 to 47%.
If speed and scale matter to your team, AI demo generation is the clear winner. You get consistent quality, instant localization to 29 languages, and the ability to regenerate any video the moment your product changes. The same workflow supports demos for every team, from marketing and sales to onboarding and support. No recording setup. No editing timeline. No freelancer invoices.
The best demo video is the one that actually exists. Speed of creation is not a nice-to-have. It is the difference between a product with demos and a product without them.
Key Takeaways
- Plan before you produce. Define your audience, choose a single flow, and structure it as Problem, Solution, Outcome. This step saves more time than any tool.
- Match your method to your resources. Manual recording for full control, agencies for maximum polish, AI generation for speed and scale.
- Keep demos under 3 minutes. Completion rates drop sharply after the 2-minute mark. Shorter demos get watched. Watched demos convert.
- Distribute strategically. A demo on your landing page drives 1.81x more conversions. A demo in sales outreach shortens your cycle. A demo in your help center reduces support tickets.
- Treat demos as living assets. Demo debt is real. Choose a creation method that lets you update videos as fast as you ship product changes.
- Start with one video. Pick your highest-value flow, create the demo, measure the impact, and build from there. Try Demosmith free and have your first video ready in under 10 minutes.