The Short Answer
A good SaaS onboarding video is short, follows one path and ends on the moment your product clicks for a new user. To make one without recording your screen, paste your app's link into Demosmith, choose Onboarding flow, say where the video should end and add a test login. Demosmith signs in, clicks through the setup and returns a narrated video with numbered steps.
That is the whole method, and this three-minute tutorial shows it end to end. It uses Cal.com's getting-started flow as the example and ends on the moment a new user copies their booking link. (Example only. Demosmith is not affiliated with Cal.com.)
The rest of this guide is the written version, with screenshots from Demosmith using a made-up analytics app, Northwind Analytics. We make Demosmith, whose AI demo agent records your product for you, so this is the workflow we know best. If you would rather record your own screen, the first section applies just the same.
What a SaaS Onboarding Video Should Include
The usual mistake is trying to show the whole product. A new user does not need the whole product. They need the shortest path to one result they care about.
Pick that result first. For a scheduling tool it is copying your booking link. For an analytics tool it is saving your first report. For a CRM it might be logging your first deal. Everything in the video should lead there, and the video should stop once it arrives.
A structure that works for most products:
| Part | What it does | Rough length |
|---|---|---|
| Welcome | One line on what the product does for them, said while the product is already on screen | 5 to 10 seconds |
| The first click | Where to start, so the empty screen is not a puzzle | 10 to 20 seconds |
| The steps to the win | Three to five numbered steps, one action each | 1 to 2 minutes |
| The win | The result on screen: the saved report, the booking link, the first deal | 5 to 10 seconds |
| What next | One next step, not a feature tour | 5 seconds |
That adds up to one to three minutes. Longer walkthroughs have their place: our guide to how long a demo video should be puts onboarding walkthroughs at up to ten minutes, because people who have signed up are willing to learn. Save those for the help centre. The first video a new user sees should be the short one.
If you want the narration word for word, our demo video script template includes a 90-second onboarding script you can adapt.
How to Make a SaaS Onboarding Video Without Recording
These are the same steps as the video. Each one takes a minute or two of your time. The recording itself happens without you.
1. Start from your app's link
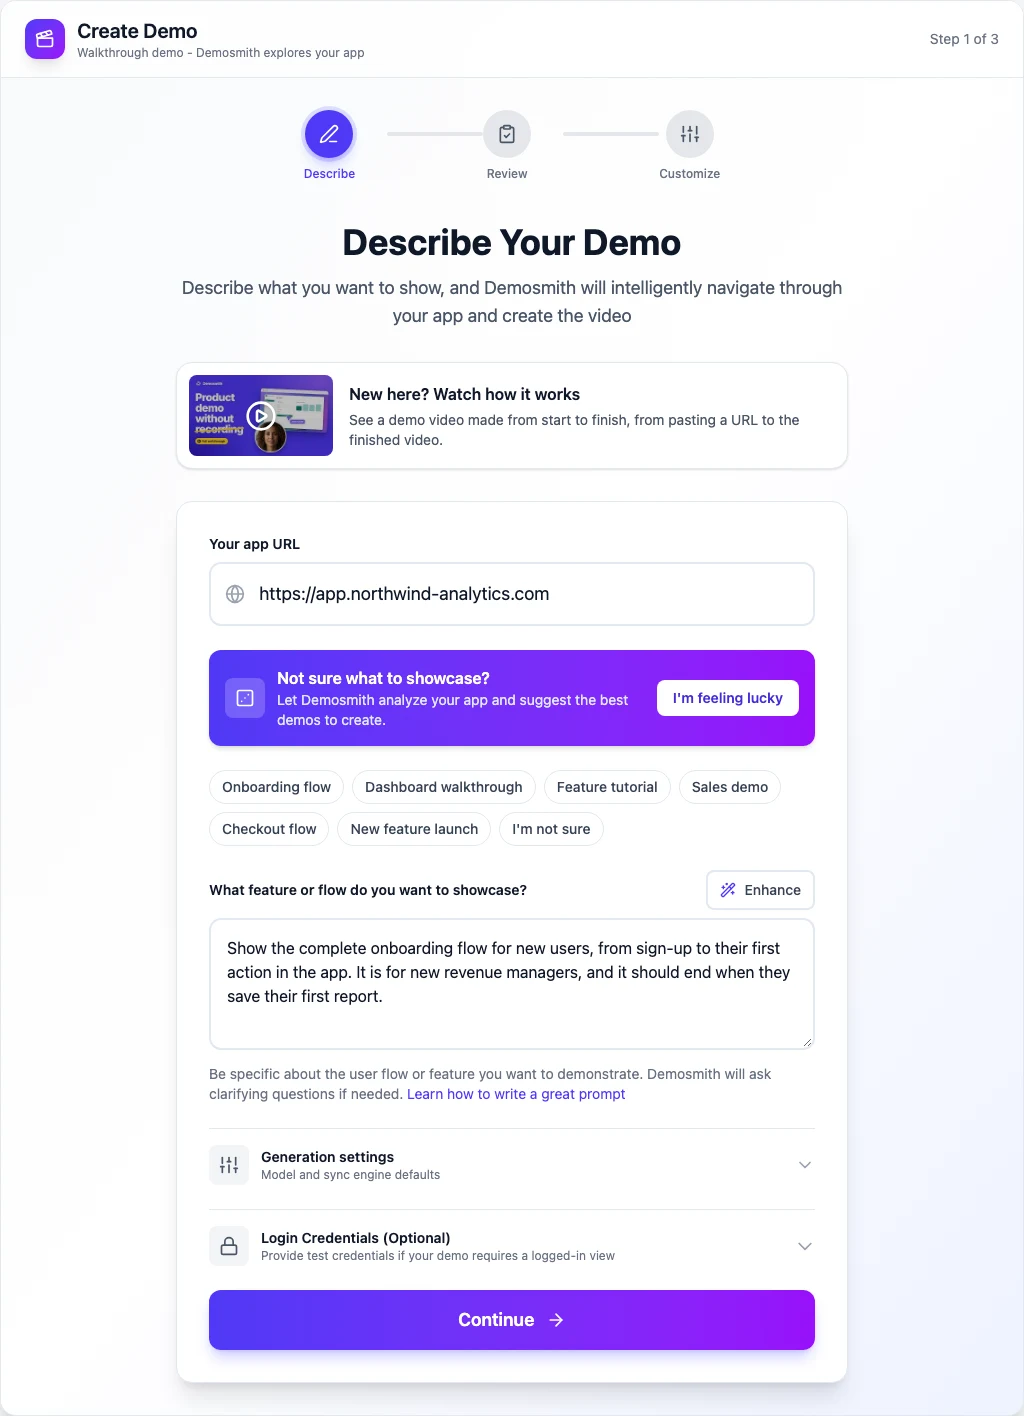
Open Demosmith, click Create Demo and choose Walkthrough Demo. Paste the link to your app. Then click Onboarding flow. It writes a starting prompt for you: show the complete onboarding flow for new users, from sign-up to their first action in the app.
2. Say who it is for and where it ends
Now make the prompt yours. Add who the video is for and the moment it should end on. For Northwind, that is new revenue managers, ending when they save their first report. Then click Enhance, and Demosmith turns your lines into a full plan for the recording.
3. Add a test login and check the plan
New users start signed in, so the recording has to start signed in too. Open Login Credentials and add a test account. The details are encrypted and only used during the recording. Use an account with realistic sample data, because whatever sits in it ends up on screen.
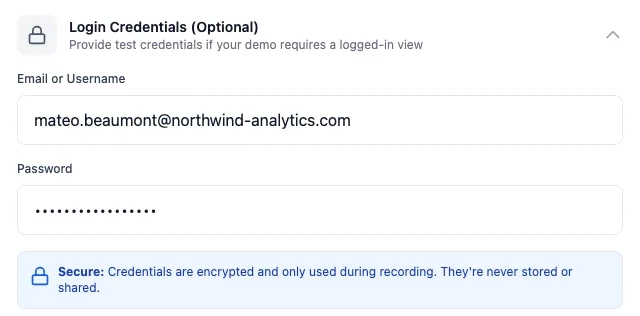
Next, Demosmith shows the plan: the steps it will take, in order. Read it the way a new user would experience it. If it wanders into features they do not need yet, cut them. When it reads right, click Looks Good.
4. Turn on numbered steps and a presenter
Two settings matter most for onboarding. Turn on Section objectives, and every step gets a number on screen, so new users always know where they are and how far is left. Then add an AI presenter to welcome them: choose one of six presenters, pick a corner and a size.
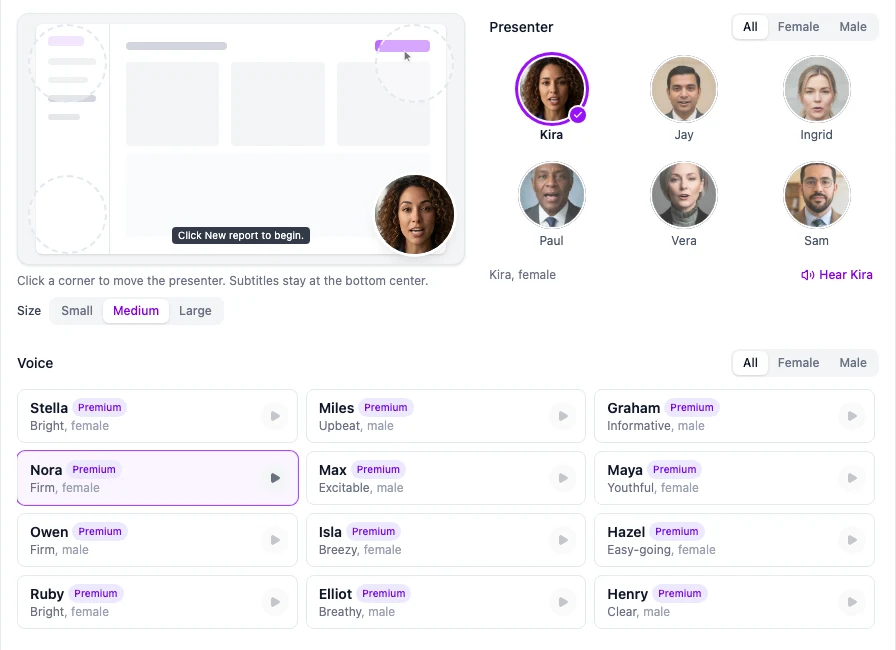
Keep the intro and outro with your logo, so the video looks like it came from your team. Then click Generate Video.
5. Let Demosmith make it
Demosmith opens your app, signs in with the test account and clicks through the onboarding path on its own. If your app asks for a sign-in code along the way, it pauses and asks you for it. A few minutes later the onboarding video is ready, with numbered steps, narration, captions and the presenter in the corner.
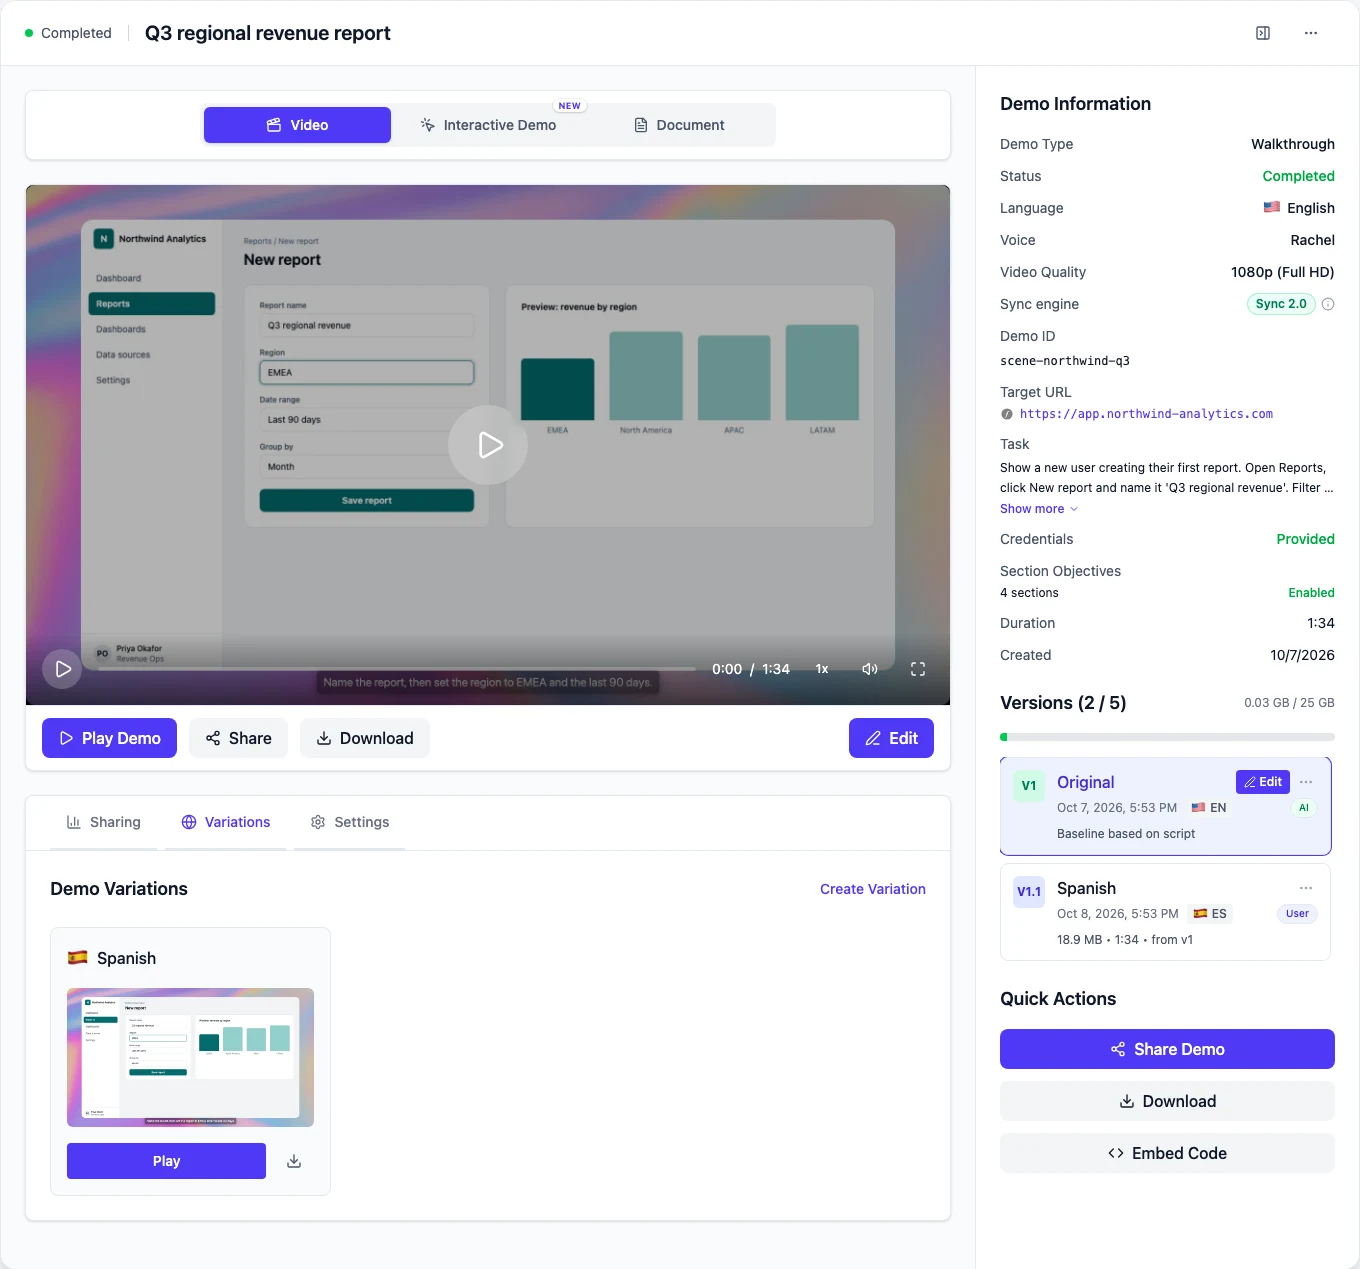
An onboarding video should end on the moment your product clicks for a new user. Anything after that is a feature tour.
Where to Put Your Onboarding Video
A video nobody finds teaches nobody. Put it where new users already are in their first week:
- The welcome email. Send the share link, so it arrives while the sign-up is still fresh.
- Your own pages. Copy the embed code into the first page after sign-up, your getting-started article or your help centre.
- A clickable version. Some people learn by doing. Open the Interactive Demo tab and the same onboarding becomes a walkthrough they click through themselves.
- A written guide. The Document tab turns it into a step-by-step guide with screenshots, as Markdown, HTML, plain text or PDF, ready for the help centre.
- Other languages. Onboarding customers abroad? Create Variation makes the same video in your customers' languages.
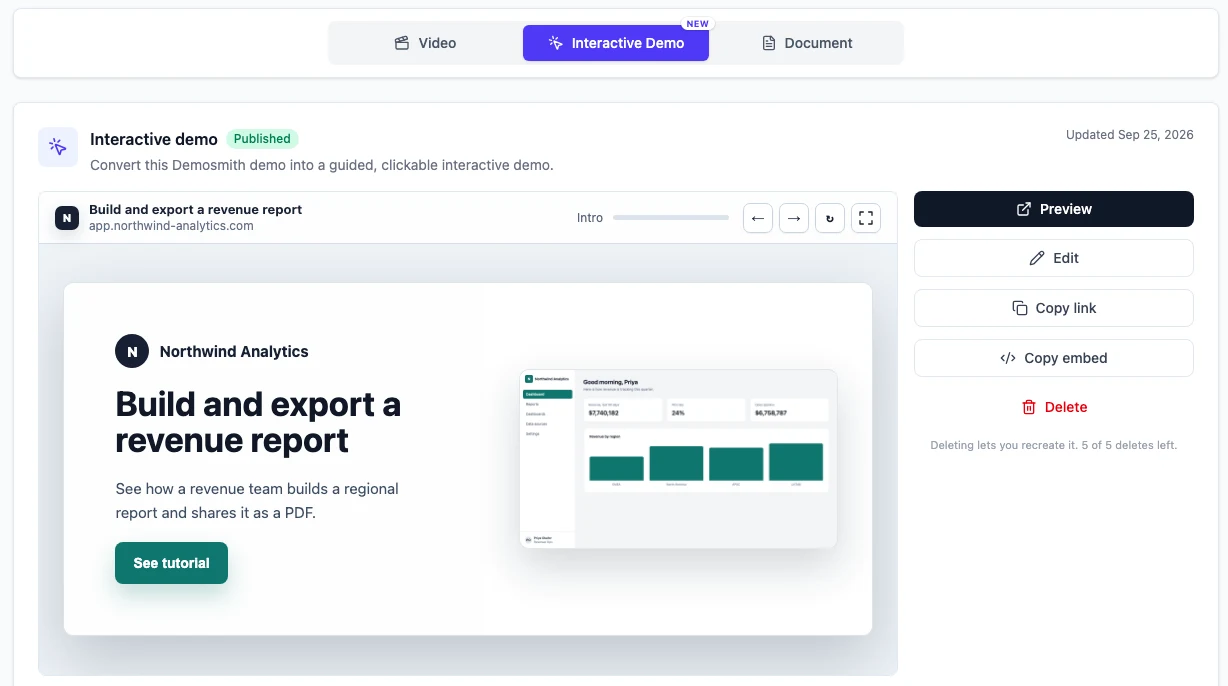
Which format to lead with depends on how your users learn. Our comparison of interactive demos and video demos covers when each works better.
One video is a start. For a full onboarding library, with a video for every key task, see our guide to automating onboarding videos at scale.
Record It Yourself or Have It Made?
Recording your own screen is still a fair choice for a single video. The two routes compare like this:
| Record it yourself | Have Demosmith make it | |
|---|---|---|
| What you do | Script, record, retake, edit, add captions | Paste a link, describe the path, check the plan |
| Voice | Yours, or a voiceover you add later | AI narration, with an optional AI presenter |
| Numbered steps and captions | Added by hand in an editor | Built in |
| When the app changes | Record it again | Re-record the demo, with the prompt you already wrote |
| Other outputs | The video | Video, interactive demo, written guide and language versions |
| Best for | A one-off video with your own face and voice | Onboarding you keep current as the product ships |
The difference shows up months later. Onboarding videos go stale every time the interface changes, and a recorded one has to be made again from scratch.
Tools that turn a browser extension capture into a guide, such as Guidde, sit between the two routes, and our Guidde alternatives guide compares them.
For the wider market of tools that make product video for you, see the roundup of the best AI demo video generators in 2026.
Onboarding Video Mistakes to Avoid
- Starting with the company story. New users already chose you. Open on the product.
- Touring every menu. If a step does not lead to the first win, cut it.
- An empty account. A blank dashboard teaches nothing. Record in an account with realistic data.
- No end point. Decide the moment the video stops before you make it, or it will drift.
- Hiding it. A great video buried three clicks deep in the help centre might as well not exist.
Conclusion
One path, one win, under three minutes. That is a SaaS onboarding video.
Decide the moment your product clicks for a new user, and make a short video that gets there and stops. You can record it yourself if you only need one. If you want onboarding that stays current as the product ships, paste your app's link into Demosmith, choose Onboarding flow and let it make the video, the clickable walkthrough and the written guide from the same run.
For the bigger picture, including the types of onboarding video and the metrics to track, read our beginner's guide to onboarding demo videos.
Our page on Demosmith for product onboarding shows the rest of the onboarding workflow.
Key Takeaways
- A SaaS onboarding video should follow one path and end on the new user's first win.
- Keep the first video between one and three minutes. Save longer walkthroughs for the help centre.
- Structure it as a welcome, the first click, three to five numbered steps, the win and one next step.
- In Demosmith, choose Onboarding flow, say where it ends, add a test login, then turn on numbered steps and an AI presenter.
- Put it in the welcome email and on your own pages, and offer the clickable and written versions too.
- Recording works for a one-off. Generated videos are easier to keep current when the product changes.
Want an onboarding video of your own app without recording anything? Start with Demosmith, paste your link and choose Onboarding flow.